Windows 10 can’t or won’t connect to Internet? No Internet connection or access after upgrading to Windows 10? There have been cases where users upgraded to Windows 10 and then they got no option to connect to the Internet. The cases are reported mostly on wireless connections. Read this post if you face Internet connectivity or access problems on Windows 10.
Windows 10 can’t connect to Internet
Microsoft attributes the problem to VPN connections present on computer that was upgraded to Windows 10. In other words, if the computer had an active VPN software during upgrade, the computer may fail to find Wi-Fi, as the VPN software might cause problems. But that is not the only case. Certain hardware is not compatible with Windows 10 and it might be cause of the problem where you cannot connect to Internet after upgrading to Windows 10. The post talks about possible solutions to the problem of No Internet connectivity.
First, make sure Wi-Fi is set to On. Open Settings > Network & Internet > Wi-Fi and move the slider to the On position. Also make sure that the physical Wi-Fi button on your laptop is turned on.
Also do the following. Right-click on the Start button to open the WinX Menu. Select Device Manager. Click on the Action tab and select Scan for hardware changes.
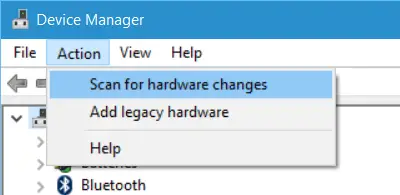
This will refresh the list.
Wi-Fi is not visible in list of networks after upgrading to Windows 10
Were you using a VPN software while upgrading to Windows 10? If no, the problem could be with the router. Check to see if the router is broadcasting the SSID. To know this:
- Type 192.168.1.1 in the browser address bar; the address is to connect to your router
- Under Wireless section of the configuration settings, see if there is an SSID and if the box against “Broadcast SSID” is checked; the wordings “broadcast SSID” may be different on different router so check for alternative labels if you can’t find “broadcast SSID” in Wireless section of router configuration page
You may also change the SSID to something else and click on Save to make sure the SSID is visible in the list of networks being displayed when you click the network icon in the Windows 10 System Tray
If you were indeed using a VPN software while upgrading to Windows 10, you will have to remove the VPN virtual card using Windows Registry Editor.
Here is how to remove it using Windows Command Prompt:
Press Windows Key + R to bring up the Run dialog
Type CMD in the Run dialog and press Enter
In the command prompt Window, type or copy-paste the following command and press Enter:
reg delete HKCR\CLSID\{988248f3-a1ad-49bf-9170-676cbbc36ba3} /va /f
Again type or copy-paste the following and press Enter:
netcfg -v -u dni_dne
Reboot the computer and see if the WiFi is listed in the list of networks that appears when you click on the Network Icon in Windows 10 System Tray
Power Cycle the Router
Sometimes, a simple power cycle can fix the issue. Remove the power plug from the router after turning it off. Leave it for few seconds, plug in the power cord, and turn it on. Check to see if the WiFi is now visible in the list of networks.
Internect connection Password Not accepted
Sometimes you find the WiFi but are not able to connect because Windows 10 will not accept the password you enter. To make sure you are entering the correct password, follow these steps:
Right click on WiFi or network icon
Select Open Network and Sharing Center
Click on Change on Adapter Settings
In the Network Properties window that appears, right click on the WiFi connection and click on Status
In the dialog box that appears, click on Wireless Properties
Click on Security Tab in the Wireless Properties window
Just below the Wireless Security Key label, you will find “Show characters” check box; click on it to see the wireless password
Note down the password and use it to connect to the WiFi
If it still creates problem, it is better to change the password in Router Configuration Page.
- Type 192.168.1.1 in the browser’s address bar
- Under the Wireless option, locate the SSID option;
- There would be an option saying password or passphrase or something similar; change the password
- Click on Save
- Close the browser
Reboot and see if you can connect to the WiFi Internet connection.
Use Windows Network Troubleshooter
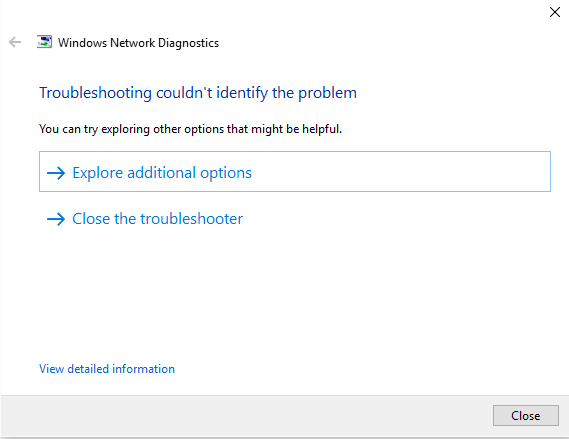
You can also use the built-in Windows Network Troubleshooter to see what is causing the problem and to fix it automatically. To start Windows Network Troubleshooter, type Network Troubleshooter in the search box next to Start Button. Click on Identify and Repair Network Connections from the list that appears. That will start Windows Network Troubleshooter. The wizard will lead you through steps to troubleshoot the connection problem.
The above explains fix when you cannot connect to Internet after upgrading to Windows 10 in brief. You might also want to see if the router is supported by connecting using an Ethernet cable. If not, contact your router manufacturer
see also : Wi-Fi does not work after upgrading to Windows 10
see also : How To Install Language Packs In Windows 7
see also : Troubleshoot Windows 10 Sound and Audio problems
see also : Quick Access in Windows 10 is not working
see also : Windows 10 cannot connect to Internet
see also : Troubleshoot Windows 10 Activation Errors: List of error codes and fixes
see also : Windows 10 Installation or Upgrade Errors: 80240020, Something Happened, etc
see also : Cannot activate Windows 10. Product Key blocked
see also : Office documents do not open after upgrading to Windows 10
see also : Nividia releases new WHQL drivers
see also : INACCESSIBLE BOOT DEVICE error in Windows 10
see also : Fix: Windows 10 Settings app does not open or launch
see also : Windows Store not working in Windows 10 – Automated Fix
see also : Windows Store apps not opening in Windows 10
see also : Start Menu does not open or not working in Windows 10
No comments:
Post a Comment